Product Status
Current Releases
– Master Concept 17.0.0 (Version: 17.0.0.130)
– Master Concept 16.2.7 (Version: 16.2.7.6)
– Master Concept 16.1.7 (Version: 16.1.7.3)
– Master Concept 12.3.9 (Version: 12.3.10.2)

Current Releases
– Master Concept 17.0.0 (Version: 17.0.0.130)
– Master Concept 16.2.7 (Version: 16.2.7.6)
– Master Concept 16.1.7 (Version: 16.1.7.3)
– Master Concept 12.3.9 (Version: 12.3.10.2)
Version: 16.2.7
Information We have released this version on the ftp.
Please Download on the customer web.
Version: 17.0.0.130
Information We have released this version on the ftp.
Please Download on the customer web.
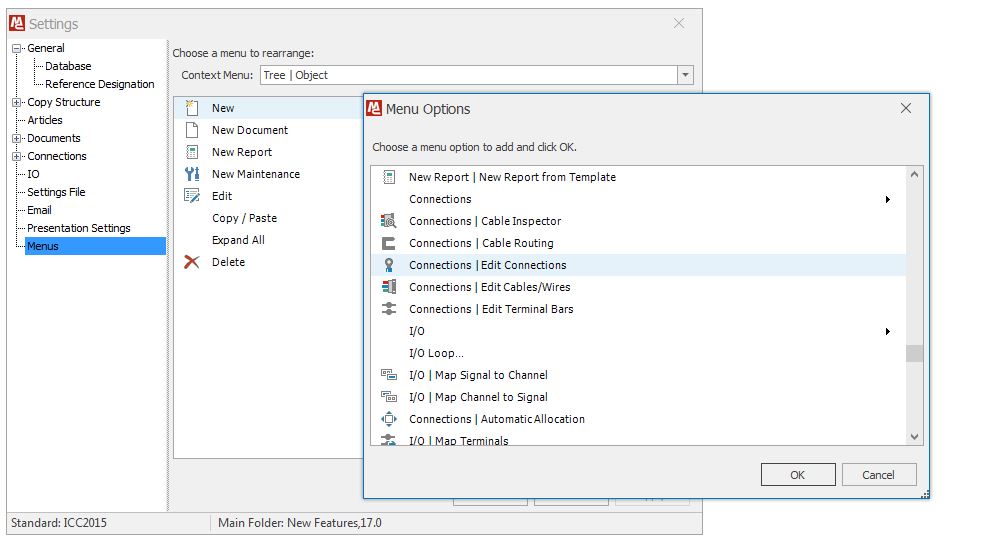
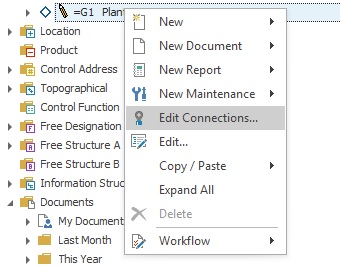
During the 16.0 version, we made the right mouse menus contain less functionality according to the Microsoft Guidelines for Ribbbon user interface.
In the 17.0 version, we made it possible for the end user to add his/her favorite functionality using a new configuration. This configuration can be found in the settings dialog.
Screenshots
Version: 16.2.6
Information We have released this version on the ftp.
Please Download on the customer web.
Current Releases
– Master Concept 16.2.5 (Version: 16.2.5.26)
– Master Concept 12.3.10 (Version: 12.3.10.2)
– Master Concept 11.2.6 (Version: 11.2.6.1)
– Master Concept 10.5.7 (Version: 10.5.7.14)
In the occasion you experience problems getting the scale correct in generated pdf of imported drawings, it might be because you did not know about this setting; UseStandardScale.
This applies in the situation where there is a difference on scale when rendering pdf of drawings manually via the PLOT dialog and using Fit To Paper compared to using the PDF-setting ScaleType=ScaleToFit. A likely cause is that the drawing you imported have custom scale.
When using the PLOT dialog AutoCAD takes additional measures for you and additional settings are adjusted when plotting.
To get the same expected result out of ScaleType when calling AutoCAD Core Console one need to specify UseStandardScale=True.
Hence you might need to add UseStandardScale to your PDF-settings for ScaleType to do what you think it does.
Example configuration:
Plotter=DWG To PDF.pc3,
MediaName=ISO_full_bleed_A3_(420.00_x_297.00_MM),
PlotStyle=monochrome.ctb,
OffsetX=0,
OffsetY=0,
Center=True,
Rotation=0,
WhatToPlot=Extents,
ScaleType=ScaleToFit,
UseStandardScale=True
By having Pdfs generated automatically you get some neat features including Pdf preview, Thumbnails and Content search. For most customers it is preferred setup to enable the automatic Pdf generator.
If your drawings are plotted using the default Pc3 provided by Autodesk, its default setting is to have the PDF opened. Often it is preferred to not have every Pdf opened. For example a batch function or checking in multiple drawings would result in a lot of open windows. The quick fix is to disable this setting.
PLOT
Select DWG To PDF.pc3 in the dropdown Plotter Name
Properties button
Plotter Configuration Editor window opens
Custom Properties in the tree
Custom Properties… button
PDF Options window opens
Show results in viewer – Disable
Close and Save.
Note that generating Pdf is a setting on/off for all document types; drawings, reports, instructions and so on. Once you have activated generating Pdf by setting the variable EPC_GENPDF=TRUE, the application where your users are most likely to notice a difference is AutoCAD. When the drawing is saved to database a plot progress bar flashes by.
What settings will be used to plot can be set up in MasterExplorer via Administration > Document > Document types > Document starts and the column Pdf-settings. If no configuration is found it will default to DWG To PDF.pc3 and using the PLOT-configuration from the drawing.
A common setup is to save a Pc3 with your desired settings and call that file in the Pdf-config.
The Quick Access Toolbar is a customizable set of commands that are available independent of what tab of the ribbon is active. Per default it is empty. You can save time by adding the commands you use most frequently to the Quick Access Toolbar. You can save even more time by using keyboard sequences for the quick access items.
Adding command to Quick Access Toolbar
To add a command you navigate to the desired command in ribbon and right click on it. From the right click menu select Add to Quick Access Toolbar.

Once a command have been added to Quick Access Toolbar you can activate it from its new additional location using mouse by clicking on it.
Using keyboard shortcuts for quick access
Keyboard shortcuts are automatically assigned to commands in quick access toolbar. To use start by pressing left ALT key. Note that it is not a modifier but an initiator of a sequence. If no additional key is immediately pressed reminders appear which if very helpful when learning to use the keyboard shortcuts. For the top level the automatically assigned shortcuts are digits starting with 1. Your first added item to the toolbar will be activated by Alt 1, the second by Alt 2, and so on.
If a menu is added to quick access toolbar its contents is also automatically assigned keyboard shortcuts. The shortcuts assigned depend on the name of the command.
If you plan to configure quick access to something highly configurable like the batch menu or the plugin menu it is a good idea to keep shortcuts in mind when naming the contents of those menus. If you can avoid having the names beginning with the same letters it is preferable.
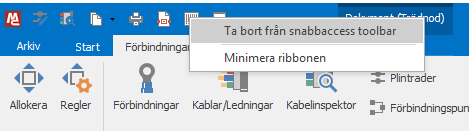
Removing command from Quick Access Toolbar
To remove a feature from the toolbar right click its icon and select Remove from Quick Access Toolbar.
Current Releases
– Master Concept 16.2.2 (Version: 16.2.2.25)
– Master Concept 16.1.6 (Version: 16.1.6.8)
– Master Concept 12.3.10 (Version: 12.3.10.2)
– Master Concept 11.2.6 (Version: 11.2.6.1)