Product Status
Current Releases
– Master Concept 12.3.4 (Version: 12.3.4.3)
– Master Concept 11.2.6 (Version: 11.2.6.1)
– Master Concept 10.5.7 (Version: 10.5.7.14)
– Master Concept 9.5.1 (Version: 9.0.0.275)

Current Releases
– Master Concept 12.3.4 (Version: 12.3.4.3)
– Master Concept 11.2.6 (Version: 11.2.6.1)
– Master Concept 10.5.7 (Version: 10.5.7.14)
– Master Concept 9.5.1 (Version: 9.0.0.275)
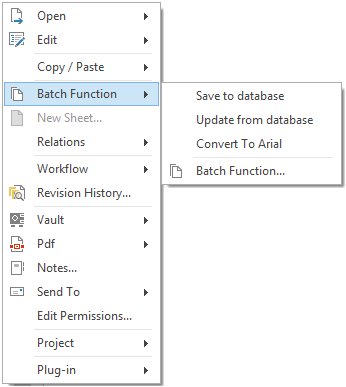
Batch-function
 <LispFunctionSetting>

<FileName>UPDATE</FileName>

<Description>Update from database</Description>

<CheckOut>true</CheckOut>

<ShortCut>true</ShortCut>

</LispFunctionSetting>
FileName is the name of the file without extension. Extension of the file must be .lsp as that is the only supported extension.
Shortcut determines wether it will be shown in the right menu.
Description is the text presented to the user.
CheckOut determines if the documents will be checked out and in by the batch engine.
The setting that deserves the most attention is the CheckOut flag. Consider what your script file does and set the flag accordingly. After the batch engine checks the drawing out and performs the batch actions it will check the drawing in again. In the case you’ve got project management the check in will be project logged.
It is quite common that batch functions are used to plot and in that case it is often prefereable not to check the drawings out. If set true the batch engine will halt on error if your batch cointains drawings that are not allowed to be checked out. Reasons to not allow check out could be that the drawing is approved or in the case of project management that the drawing is currently involved in a project other than the users active project.
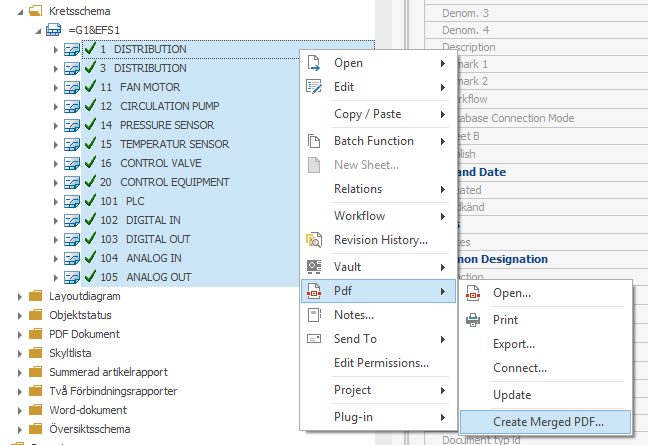
Create Merged PDF
When starting elMaster Design the application start will first start the AutoCAD you used last and then load elMaster Design functionality. If there are more AutoCAD products installed you need to make sure the desired product is the one you had last started before starting elMaster Design. Assuming you always want the same version and product there are settings to make switching applications easier.
The following switches are supported both in configuration of Document Start and on shortcuts for stand alone Design.
/product is passed on to AutoCAD and accepts the same input as the native AutoCAD switch. It expects a product shortname like; ACAD, ACADM, MEP
/acadver accepts version as written in the name of the vertical; 2014, 2015, 2016. Version numbers on format R19.1 are currently not supported. Please note that support for this switch was intruduced in 12.2.2.
/p is the native AutoCAD switch for profile. For some starts you may have to refer to an existing profile to get the desired environment. If no profile is specified AutoCAD will be launched and AutoCAD will continue using which ever profile is current.
The configuration of what application to start is found among the document settings; Administration > Settings > Document > Document type. Go to the tab Document Start and look for the columns External Application and Switches.
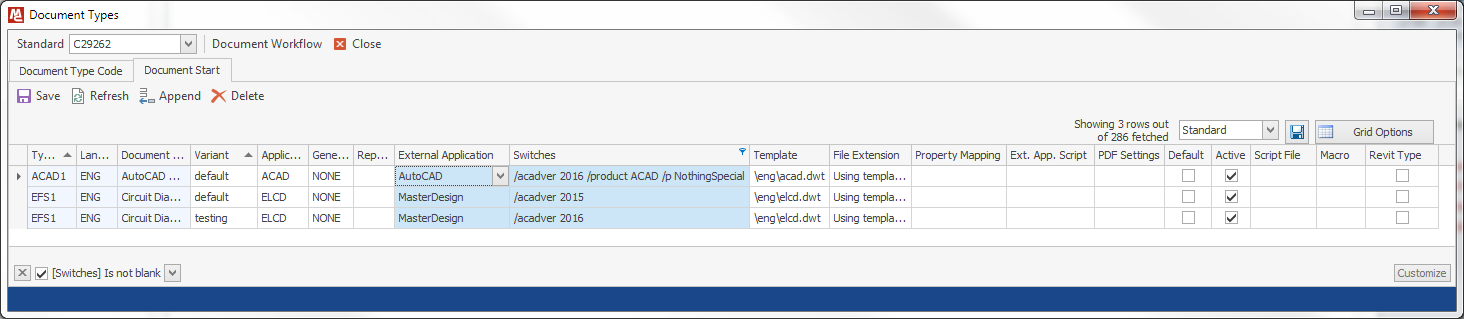
Currently using AutoCAD 2015 while trying out 2016.
The column Switches works very much the same way as adding switches to a program shortcut.
When setting external application to MasterDesign the Design profile is loaded by the document start and there is no need to specify profile.
The switches above are supported by stand alone elMaster Design by editing the shortcut adding the desired switches.
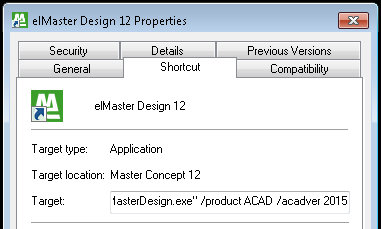
Shortcut with switches