Avoid batch plots being mixed up

Did someone elses printings end up among the pages of your batch plot?
If many users batch plot to the same network printer there is risc the printed pages are mixed up. There are sophisticated printers that sorts the printed pages per user either by use of multiple trays or by use of queuing where users need to sign in to the printer to have their print jobs executed. Those often comes with a cost though.

Print a merged pdf

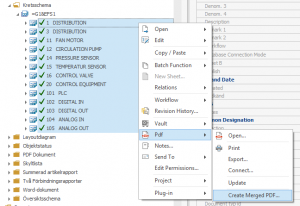
A simple trick to have your batch plot be printed as one document. Instead of batch plot you make a merged pdf of the desired documents and print that.
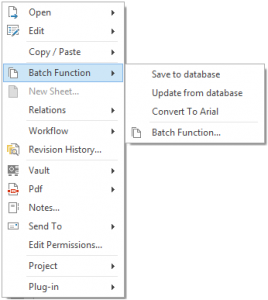
Right click menu > PDF > Create Merged PDF

Create Merged PDF

You might experience a slight drawback in terms of quality. You have less control of how a drawing is printed from pdf compared to plotting directly from dwg. If you notice a difference and want top notch plots it is recommended avoiding going via pdf.

Update: Using switches for AutoCAD verticals

When starting elMaster Design the application start will first start the AutoCAD you used last and then load elMaster Design functionality. If there are more AutoCAD products installed you need to make sure the desired product is the one you had last started before starting elMaster Design. Assuming you always want the same version and product there are settings to make switching applications easier.


Switches

The following switches are supported both in configuration of Document Start and on shortcuts for stand alone Design.

/product is passed on to AutoCAD and accepts the same input as the native AutoCAD switch. It expects a product shortname like; ACAD, ACADM, MEP

/acadver accepts version as written in the name of the vertical; 2014, 2015, 2016. Version numbers on format R19.1 are currently not supported. Please note that support for this switch was intruduced in 12.2.2.

/p is the native AutoCAD switch for profile. For some starts you may have to refer to an existing profile to get the desired environment. If no profile is specified AutoCAD will be launched and AutoCAD will continue using which ever profile is current.


Document start settings in MasterConcept

The configuration of what application to start is found among the document settings; Administration > Settings > Document > Document type. Go to the tab Document Start and look for the columns External Application and Switches.

External Application & Switches

Currently using AutoCAD 2015 while trying out 2016.

The column Switches works very much the same way as adding switches to a program shortcut.

When setting external application to MasterDesign the Design profile is loaded by the document start and there is no need to specify profile.


Shortcut for stand alone elMaster Design

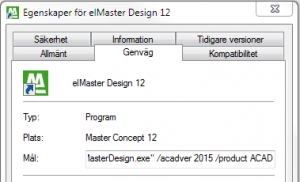
The switches above are supported by stand alone elMaster Design by editing the shortcut adding the desired switches.

Shortcut with switches

Shortcut with switches

Product Status

Current Releases

– Master Concept 12.3.3 (Version: 12.3.3.2)
– Master Concept 11.2.6 (Version: 11.2.6.1)
– Master Concept 10.5.7 (Version: 10.5.7.14)
– Master Concept 9.5.1 (Version: 9.0.0.275)

MasterConcept 12.3.3 SR3 Fix3 Released

Version: 12.3.3.2

Information We have released this version on the ftp.

Please Download on the customer web.

MasterConcept 12.2 SR2 Fix3 Released

Version: 12.2.3.17

Information We have released this version on the ftp.

Please Download on the customer web.

Project Log in version 12

With MasterConcept 12 a report type called Project Log is introduced. This type can be used similar to some of the hard coded quick reports for projects that existed in earlier versions. A major advantage is that the reports are now fully configurable as any other document type.

To set up a project log go to Administration > Settings > Document > Document Types and append. If you already have a suitable Document Type in your standard go to the tab Document Start and append a new Variant. Depending on your perspective you probably consider its category to be TSK1 or APPLIST and should name it according with your naming conventions.

Setup of Project Log

Setup of Project Log

A crystal template applist_plog.rpt is included with the file server install. Feel free to use a custom template of your own.

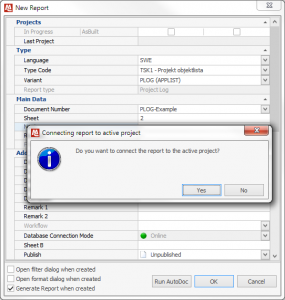
When creating a report of this variant the user will get a question to confirm that the current project is the correct project and the report will connect.

Creating a Project Log

Creating a Project Log

Additional report types were introduced in the same release. For more information on the Mounting Report type and the Project Depending Report type refer to the readme.

Set which AutoCAD to run elMaster Design

When starting elMaster Design the application start will first start the AutoCAD you used last and then load elMaster Design functionality. If there are more AutoCAD products installed you need to make sure the desired product is the one you had last started before starting elMaster Design. Assuming you always want the same version and product there are settings to make switching applications easier.

Settings for MasterConcept

The configuration of what application to start is found among the document settings; Administration > Settings > Document > Document type. Go to the tab Document Start and look for the columns External Application and Switches.

External Application & Switches

Currently using AutoCAD 2015 while trying out 2016.

The column Switches works very much the same way as adding switches to a program shortcut. The following switches are supported both as shortcut and document start setting.

/product is passed on to AutoCAD and accepts the same input as the native AutoCAD switch. It expects a product shortname like; ACAD, ACADM, MEP

/acadver accepts version as written in the name of the vertical; 2014, 2015, 2016. Version numbers on format R19.1 are currently not supported. Please note that support for this switch was intruduced in 12.2.2.

/p is the native AutoCAD switch for profile. For some starts you may have to refer to an existing profile to get the desired environment. If no profile is specified AutoCAD will be launched and AutoCAD will continue using which ever profile is current.

When setting external application to MasterDesign the Design profile is loaded by the document start and there is no need to specify profile.


Settings for stand alone elMaster Design

The switches above are supported by stand alone elMaster Design by editing the shortcut adding the desired switches.

Shortcut with switches

Shortcut with switches


Depricated

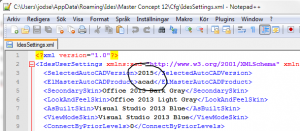
Edited. The tags described below are depricated from 12.3 and the above alternatives are  recommended. Tags are only to be used for older AutoCAD versions before acad.exe had support for the product switch.

As an alternative the settings are also available through the settings file.
%appdata%\Ides\Master Concept 12\Cfg\IdesSettings.xml

IdesSettings.xml

Tags in IdesSettings.xml

To set a preferred version of AutoCAD add the tag SelectedAutoCADVersion and a version number such as; 2014, 2015, 2016.

To set a preferred AutoCAD-product add the tag ElmasterAutoCADProduct and a product shortname like; ACAD, ACADM, MEP.

Product Status

Current Releases

– Master Concept 12.2.2 (Version: 12.2.2.29)
– Master Concept 11.2.6 (Version: 11.2.6.1)
– Master Concept 10.5.7 (Version: 10.5.7.14)
– Master Concept 9.5.1 (Version: 9.0.0.275)

Planned Releases

MasterConcept 12.2 SR2 Fix2 Released

Version: 12.2.2.29

Information We have released this version on the ftp.

Please Download on the customer web.

Larger drawing area for small screens

For those of you who use elMaster Design on laptops with small screens there are some tweaks one can do to improve the drawing area. Minimizing toolbars to improve the drawing area can also be useful for those users who spend a lot of time reviewing drawings.

Minimize to improve drawing area

Minimize these to improve drawing area – Click image to see full size

1. Size of ribbon can be set to text only menu, a compromise or a full size ribbon page.  If you prefer how elMaster Design looked prior to the introduction of ribbon you can mimic that appearance using this setting. If you are reviewing and do not intend to work with the drawings you can save even more screen area with RIBBONCLOSE to hide the ribbon. Use RIBBON to show it again.

2. Ides Toolpalette can be docked. If you by accident close it you can have it opened again using IDESTOOLPALETTE.

3. Hide the command line with Ctrl+9 or COMMANDLINEHIDE. As an alternative one can undock it to have it floating in the drawing area which allows for a larger drawing area.

Large drawing area

Large drawing area – Click image to show full size