Posts

Disable AutoCAD PDF Preview

By having Pdfs generated automatically you get some neat features including Pdf preview, Thumbnails and Content search. For most customers it is preferred setup to enable the automatic Pdf generator.

If your drawings are plotted using the default Pc3 provided by Autodesk, its default setting is to have the PDF opened. Often it is preferred to not have every Pdf opened. For example a batch function or checking in multiple drawings would result in a lot of open windows. The quick fix is to disable this setting.

PLOT
Select DWG To PDF.pc3 in the dropdown Plotter Name
Properties button
Plotter Configuration Editor window opens
Custom Properties in the tree
Custom Properties… button
PDF Options window opens
Show results in viewer – Disable
Close and Save.

For administrators

Note that generating Pdf is a setting on/off for all document types; drawings, reports, instructions and so on. Once you have activated generating Pdf by setting the variable EPC_GENPDF=TRUE, the application where your users are most likely to notice a difference is AutoCAD. When the drawing is saved to database a plot progress bar flashes by.

What settings will be used to plot can be set up in MasterExplorer via Administration > Document > Document types > Document starts and the column Pdf-settings. If no configuration is found it will default to DWG To PDF.pc3 and using the PLOT-configuration from the drawing.

A common setup is to save a Pc3 with your desired settings and call that file in the Pdf-config.

Make use of Quick Access Toolbar

The Quick Access Toolbar is a customizable set of commands that are available independent of what tab of the ribbon is active. Per default it is empty. You can save time by adding the commands you use most frequently to the Quick Access Toolbar. You can save even more time by using keyboard sequences for the quick access items.


Adding command to Quick Access Toolbar

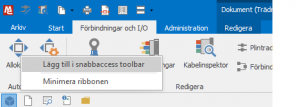
To add a command you navigate to the desired command in ribbon and right click on it. From the right click menu select Add to Quick Access Toolbar.

snabbaccess-add

Once a command have been added to Quick Access Toolbar you can activate it from its new additional location using mouse by clicking on it.


Using keyboard shortcuts for quick access

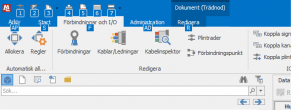
Keyboard shortcuts are automatically assigned to commands in quick access toolbar. To use start by pressing left ALT key. Note that it is not a modifier but an initiator of a sequence. If no additional key is immediately pressed reminders appear which if very helpful when learning to use the keyboard shortcuts. For the top level the automatically assigned shortcuts are digits starting with 1. Your first added item to the toolbar will be activated by Alt 1, the second by Alt 2, and so on.

alt_snabbaccess

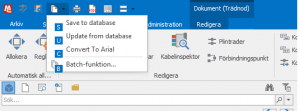
If a menu is added to quick access toolbar its contents is also automatically assigned keyboard shortcuts. The shortcuts assigned depend on the name of the command.

snabbaccess-submeny

If you plan to configure quick access to something highly configurable like the batch menu or the plugin menu it is a good idea to keep shortcuts in mind when naming the contents of those menus. If you can avoid having the names beginning with the same letters it is preferable.


Removing command from Quick Access Toolbar

To remove a feature from the toolbar right click its icon and select Remove from Quick Access Toolbar.


snabbaccess-remove

Configuring the Batch-function menu

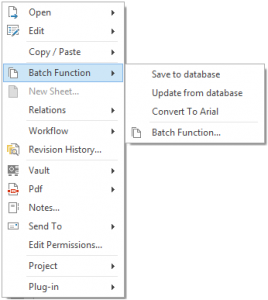
The Batch-function menu in MasterExplorer is configurable and you can easily add your Lsp scripts to it.
Batch-function

Batch-function

The configuration is held in LSPsettings.xml which is located together with your Lsp script files in the \Scripts\Lsp folder at your IdesFileServer. Below is an extract showing the configuration for one script file.

<LispFunctionSetting>
<FileName>UPDATE</FileName>
<Description>Update from database</Description>
<CheckOut>true</CheckOut>
<ShortCut>true</ShortCut>
</LispFunctionSetting>


FileName is the name of the file without extension. Extension of the file must be .lsp as that is the only supported extension.

Shortcut determines wether it will be shown in the right menu.

Description is the text presented to the user.

CheckOut determines if the documents will be checked out and in by the batch engine.

The setting that deserves the most attention is the CheckOut flag. Consider what your script file does and set the flag accordingly. After the batch engine checks the drawing out and performs the batch actions it will check the drawing in again. In the case you’ve got project management the check in will be project logged.

It is quite common that batch functions are used to plot and in that case it is often prefereable not to check the drawings out. If set true the batch engine will halt on error if your batch cointains drawings that are not allowed to be checked out. Reasons to not allow check out could be that the drawing is approved or in the case of project management that the drawing is currently involved in a project other than the users active project.